Wow. As a blogger I'm not so good. LOL Life gets in the way and blogging takes a back seat.
My "Diagonal Leaf Cuff" project was published in Beadwork Magazine, February - March Issue, 2013. Here's a link to the magazine site.
http://www.beadingdaily.com/blogs/beadwork/archive/2013/01/01/beadwork-february-march-2013.aspx
We were in the middle of my husband's health crisis when the magazine came out so I wasn't able to promote it as much as I normally would. We almost lost him but he is doing well now. Thank God!
I do have more diagonal leaf projects in my 'ideas book' that I scribble in, but they will have to wait for a while. Once life settles down (yea right! LOL) I hope to get back to designing and enjoying my beads again.
Saturday, September 14, 2013

Tuesday, June 26, 2012
CATCHING UP AND OTHER THINGS
Arrg! For some reason I've not been able to sign in to my blog for a long time. It seems that they've 'updated' again and that always seems to have issues. I finally got in today. Whew! So far, I do like the new format though. Creating and editing the posts is much easier now.
A couple weeks ago I had the day from hell! My old computer, where I store all of my patterns and such, crashed. I'm in the process of trying to figure that mess out. Thankfully, I have some of them backed up on old disks. One of these days I hope to update my old class handouts and maybe put them up for sale. Because I get so many requests for them, I've also been thinking about making individual patterns out of the projects in my Dimensional Flowers, Leaves & Vines book since it's out of print and I don't plan to reprint it.
In the mean time, I've just been experimenting and playing with tecnhique. I seldom finish a whole project because I'm having so much fun just experimenting. LOL Once I do something new I play with the technique for a while but then I get bored and put it aside and go back to experimenting.
I always say I'm like a 'mad scientist beader'. Like Dr. Frankenstein in the vintage movies with his hair standing on end, crazed look in his eye laughing in his demented, mwahaha! mwahaha! mwahaha! way at the sheer joy of creating. I can hear him now screaming ecstatically, "It's alive! It's alive! It's alive!"
One of these days I'll have to actually finish a project! Now wouldn't that be something! ROFL Actually, I am working on and idea that is, like ol' Doc Franky's Creation, put together in bits and pieces, but that's a story for a different post at a different time. (Ohhh I'm sooooooo baaaaad!)
In the mean time, I'm off to do some more experimenting. mwahaha! mwahaha! Mwahaha!... It's alive! It's alive! It's alive!!!!!!!
A couple weeks ago I had the day from hell! My old computer, where I store all of my patterns and such, crashed. I'm in the process of trying to figure that mess out. Thankfully, I have some of them backed up on old disks. One of these days I hope to update my old class handouts and maybe put them up for sale. Because I get so many requests for them, I've also been thinking about making individual patterns out of the projects in my Dimensional Flowers, Leaves & Vines book since it's out of print and I don't plan to reprint it.
In the mean time, I've just been experimenting and playing with tecnhique. I seldom finish a whole project because I'm having so much fun just experimenting. LOL Once I do something new I play with the technique for a while but then I get bored and put it aside and go back to experimenting.
I always say I'm like a 'mad scientist beader'. Like Dr. Frankenstein in the vintage movies with his hair standing on end, crazed look in his eye laughing in his demented, mwahaha! mwahaha! mwahaha! way at the sheer joy of creating. I can hear him now screaming ecstatically, "It's alive! It's alive! It's alive!"
One of these days I'll have to actually finish a project! Now wouldn't that be something! ROFL Actually, I am working on and idea that is, like ol' Doc Franky's Creation, put together in bits and pieces, but that's a story for a different post at a different time. (Ohhh I'm sooooooo baaaaad!)
In the mean time, I'm off to do some more experimenting. mwahaha! mwahaha! Mwahaha!... It's alive! It's alive! It's alive!!!!!!!
Tuesday, November 22, 2011
Diagonal Leaf Cuff Tutorial Not Available At This Time
I've submitted my Diagonal Leaf Cuff to a magazine for a possible article. :) Under their rules, I can't sell the tutorial at this time so I've taken it of the market for now. I'll keep you posted on when and where it will be available again.
Barb :)
Barb :)
Wednesday, October 19, 2011
Aryd'ell Puts Her Own Twist To My Diagonal Leaf Cuff
Aryd'ell has put her own twist to my Diagonal Leaf Cuff. She used vintage seed beads (circa 1900) from Vinice, Italy to create her very festive version of the cuff! She also added tiny flowers to the edges. Adorable!
Take a closer look at the seed beads, they have two colors on each bead!
 You can see more of Aryd'ell's beautiful beadwork on her blog:
http://gypsysramblings.blogspot.com/
Take a closer look at the seed beads, they have two colors on each bead!

http://gypsysramblings.blogspot.com/
Lily, A Beginner Makes The Cuff
Wahoo! I'm so pleasently surprised! My Digaonal Leaf Technique is really an intermediate to advanced technique but Lily, a beginner, has made a cuff for herself! I'm so thrilled that she was adventurous enough to try it. I love the gentle pink color. :)
It looks like Lily used larger beads than I did which creates a wider cuff. Well done Lily. Well done!

Be sure to visit Lily's blog where you can see her beautiful crochet work and some of her beginning beading . :)
http://miss-crochet.blogspot.com/
It looks like Lily used larger beads than I did which creates a wider cuff. Well done Lily. Well done!

Be sure to visit Lily's blog where you can see her beautiful crochet work and some of her beginning beading . :)
http://miss-crochet.blogspot.com/
Monday, October 10, 2011
DIAGONAL LEAF CUFF TUTORIAL IS NOW READY!
Pardon my 'shouting' in the subject line. But I'm excited. Finally! It's here! After months of writing, drawing, testing, redrawing, retesting and working through every detail with my testers, my Diagonal Leaf Cuff is finally ready to be released! What a journey this has been!
I'm so excited to finally be able to introduce you to my Diagonal Leaf Technique. Inspired by macrame`'s diagonal double half hitch leaf technique, I developed my Diagonal Leaf beading technique in 2007. I love how the technique creates the form of leaves connecting at 45 degree angles with a more subtle, secondary diamond element between them.
Way back in 2007 I was looking through our photo albums and found a few very old, fuzzy, pictures of some of the macrame` designs I'd created way back in the 1960's through the 1980's. One of my designs was a huge wall hanging in which I'd used the diagonal double half hitch leaf macrame` technique. I 'see' everything in beads and as I studied the picture I realized that each half hitch could represent a bead. And that's how my Diagonal Leaf Technique was born.
Here's a picture of the part of my old macrame` wall hanging that inspired this new beading technique. Please excuse how old and fuzzy it is.

So this old macrame` technique - after some experimenting way back in 2007 went from double half hitch knots to beads. And this is the result. :)

I've shown the Diagonal Leaf Technique to few people and taught it to a few others. I've really enojoyed working on the tutorial getting it ready to share with beaders. My testers have been real troopers working hard, giving me feedback and encouraging me to get it done. And the owners of StitchBoard have held my hand through the whole process as well.
You can find these beautiful colors at Cindy's Crafts, http://www.beadlady.biz/
The color numbers are: 462D & 469. Cindy has also held my hand through this whole tutorial. She and the others encouraged me to keep going when I thought I'd never get it done. Well, it's done.
So, drum rolll please!!!
You can access my Diagonal Leaf Cuff tutorial on Stitchboard, the same site that also sells my Pinecone Delight tutorial.
Here's a link to the site. Be sure to look around while you are there:
http://stitchboard.com/mall/showItem.php?in=10236
Have a wonderful day! Enjoy!
Barb
P.S. Just in case you'd like to see the whole macrame` wall hanging, here's the fuzzy old picture. The jute cords were 17 feet long when I started the project! What Was I thinking? LOL

Enjoy! Barb
I'm so excited to finally be able to introduce you to my Diagonal Leaf Technique. Inspired by macrame`'s diagonal double half hitch leaf technique, I developed my Diagonal Leaf beading technique in 2007. I love how the technique creates the form of leaves connecting at 45 degree angles with a more subtle, secondary diamond element between them.
Way back in 2007 I was looking through our photo albums and found a few very old, fuzzy, pictures of some of the macrame` designs I'd created way back in the 1960's through the 1980's. One of my designs was a huge wall hanging in which I'd used the diagonal double half hitch leaf macrame` technique. I 'see' everything in beads and as I studied the picture I realized that each half hitch could represent a bead. And that's how my Diagonal Leaf Technique was born.
Here's a picture of the part of my old macrame` wall hanging that inspired this new beading technique. Please excuse how old and fuzzy it is.

So this old macrame` technique - after some experimenting way back in 2007 went from double half hitch knots to beads. And this is the result. :)

I've shown the Diagonal Leaf Technique to few people and taught it to a few others. I've really enojoyed working on the tutorial getting it ready to share with beaders. My testers have been real troopers working hard, giving me feedback and encouraging me to get it done. And the owners of StitchBoard have held my hand through the whole process as well.
You can find these beautiful colors at Cindy's Crafts, http://www.beadlady.biz/
The color numbers are: 462D & 469. Cindy has also held my hand through this whole tutorial. She and the others encouraged me to keep going when I thought I'd never get it done. Well, it's done.
So, drum rolll please!!!
You can access my Diagonal Leaf Cuff tutorial on Stitchboard, the same site that also sells my Pinecone Delight tutorial.
Here's a link to the site. Be sure to look around while you are there:
http://stitchboard.com/mall/showItem.php?in=10236
Have a wonderful day! Enjoy!
Barb
P.S. Just in case you'd like to see the whole macrame` wall hanging, here's the fuzzy old picture. The jute cords were 17 feet long when I started the project! What Was I thinking? LOL

Enjoy! Barb
My Newest Tutorial. Diagonal Leaf Cuff!
For the past sevreal months I've been working on a new tutorial. My testers have finally given it the ok! Wahooo!
We're waiting on one more thing before it's ready for sale, hopefully, later on today, but I thought I'd give you a little preview of my newest cuff! And a new technique too!
I developed this technique way back in 2007, but life got in the way and I've not done too much with it. :) I showed it to a few people, taught it to a few people and of course, now my testers have been testing it for quite some time now.
My testers finally gave me the go ahead yesterday. We are ready to launch, as soon as we take care of a small technical issue.
But I thought I'd go ahead and give you a sneek peek. :) I'll let you know when the tutorial is available.

I hope you enjoy the eye candy. :)
Barb
We're waiting on one more thing before it's ready for sale, hopefully, later on today, but I thought I'd give you a little preview of my newest cuff! And a new technique too!
I developed this technique way back in 2007, but life got in the way and I've not done too much with it. :) I showed it to a few people, taught it to a few people and of course, now my testers have been testing it for quite some time now.
My testers finally gave me the go ahead yesterday. We are ready to launch, as soon as we take care of a small technical issue.
But I thought I'd go ahead and give you a sneek peek. :) I'll let you know when the tutorial is available.

I hope you enjoy the eye candy. :)
Barb
Thursday, September 1, 2011
Look What Aryd'ell Did With The Pinecone!
I love what my cyber friend Aryd'ell did with my pinecone instructions! I've created my own little Lotus Flowers and she's designed her own ring and earrings.
Aryd'ell is a very talented beadwork artist who has worked her magic in a variation of my pinecone to create the most darling ring and earrings. They are absolutely adorable! Take a look below:


Aryd'ell is a very talented beadwork artist who has worked her magic in a variation of my pinecone to create the most darling ring and earrings. They are absolutely adorable! Take a look below:


Well done Aryd'ell!! Thanks for letting me share them on my blog. :) You rock!
You can see more of Aryd'ell's work on her blog:
Tuesday, August 23, 2011
Pinecone Delight Erratum
Pinecone Delight Erratum. Ohhhh, that sounds like something exotic doesn't it? Actually, it's just a fancy word for mistake. LOL We found a small mistake in the pinecone instructions. I can't believe we missed this, but sometimes these things happen.
If you bought the tutorial after August 12, 2011 you already have the corrected version and don't need to do anything else.
If you bought the tutorial before August 12th, you should have received an email from the StitchBoard staff with instructions on how to download the corrected version. If you haven't received the email yet, please check your spam folder. You can also go to http://stitchboard.com/index.php?r=0 and contact the staff.
If you bought the tutorial directly from Cindy you can contact her at beadlady@beadlady.biz
The error was just in the text portion, the graphic is correct.
Page 2, Row 2, Step 1, paragraph 3 .
In the 3rd paragraph it says:
Pass needle UNDER the 'thread bridge" to the right (the thread between beads #2 & #3) of row 1 from the outside to the center of the circle. Fig. 13
It should have read:
"Pass needle UNDER the 'thread bridge" to the right (the thread between beads #1 & #2) of row 1 from the outside to the center of the circle. Fig. 13"
I'd love to see some pictures of your finished pinecones. :)
Enjoy! Barb
If you bought the tutorial after August 12, 2011 you already have the corrected version and don't need to do anything else.
If you bought the tutorial before August 12th, you should have received an email from the StitchBoard staff with instructions on how to download the corrected version. If you haven't received the email yet, please check your spam folder. You can also go to http://stitchboard.com/index.php?r=0 and contact the staff.
If you bought the tutorial directly from Cindy you can contact her at beadlady@beadlady.biz
The Correction
The error was just in the text portion, the graphic is correct.
Page 2, Row 2, Step 1, paragraph 3 .
In the 3rd paragraph it says:
Pass needle UNDER the 'thread bridge" to the right (the thread between beads #2 & #3) of row 1 from the outside to the center of the circle. Fig. 13
It should have read:
"Pass needle UNDER the 'thread bridge" to the right (the thread between beads #1 & #2) of row 1 from the outside to the center of the circle. Fig. 13"
I'd love to see some pictures of your finished pinecones. :)
Enjoy! Barb
Tuesday, August 9, 2011
Computer Crashes And Old Patterns
Arrg! Almost all of my older patterns and class workshops are on my old computer. It just limps along and sometimes it quits for no reason. Sometimes I can revive it and sometimes it's just plain stubborn. It's like an old mule that just decides it isn't going to take another step. LOL
I was really freaking out tonight when "The Ol' Gal" (the computer - not me) just up and quit. She's really tempermental and does that from time to time. Most of the time I can get it started after several attempts but sometimes it just won't work so daughter and her hubby come over and fix it for me.
I was sweating bullets tonight when it quit because I have some very special projects in that old computer that I've only shown to two or three people - even though I made them years ago. I've been thinking about those particular projects lately and decided to review and/or revise the tutorials I wrote for them. I might put them in a book or sell them as individual projects some day but I haven't made that decision yet.
Just as I was searching through the projects the computer crashed. Arrg! I thought I had the files backed up but when I went looking I couldn't find them anywhere. Yikes! Now I started to panic. I'd gone from sweating to praying. I learned a long time ago not to bargan with God so I just kept praying and turning the computer on again every time it shut down. Finally I got it up and running. I saved a few files to my flash drive, then the screen went black again and the computer made that horrible, heavy sigh and then went silent. Arrg and double arrg!
I grabbed the canned air and blew out the hard drive.. cough, cough..gag.. yuck. It looked like a giant sand storm coming out of that black hole. Then, just as the air started to clear, I ran out of canned air. It's the middle of the night and the only store open is several miles away. Rats! So I took a deep breath and pushed the start button. Those few seconds seemed like an eternity and then the screen flickered, I saw some words and finally the full screen. The 'Ol' Gal' is working again. How long will she work? Only God knows and He ain't sayin'!
She's run long enough for me to save the main files I was worried about to my flash drive. Wahoo! Barb doing happy dog dance here! There are still a few files on the old computer that I need to transfer, but they aren't as important as the ones I was fretting over. Moral of the story! Back up those precious files. Oh, I also printed them out so I have a visual just in case the back up fails too. LOL
Well, that's been my night. I didn't get any beading done but I did preserve my tutorials. Now that's worth losing a bit of sleep for. :)
Enjoy and bead something beautiful today!
Barb
I was really freaking out tonight when "The Ol' Gal" (the computer - not me) just up and quit. She's really tempermental and does that from time to time. Most of the time I can get it started after several attempts but sometimes it just won't work so daughter and her hubby come over and fix it for me.
I was sweating bullets tonight when it quit because I have some very special projects in that old computer that I've only shown to two or three people - even though I made them years ago. I've been thinking about those particular projects lately and decided to review and/or revise the tutorials I wrote for them. I might put them in a book or sell them as individual projects some day but I haven't made that decision yet.
Just as I was searching through the projects the computer crashed. Arrg! I thought I had the files backed up but when I went looking I couldn't find them anywhere. Yikes! Now I started to panic. I'd gone from sweating to praying. I learned a long time ago not to bargan with God so I just kept praying and turning the computer on again every time it shut down. Finally I got it up and running. I saved a few files to my flash drive, then the screen went black again and the computer made that horrible, heavy sigh and then went silent. Arrg and double arrg!
I grabbed the canned air and blew out the hard drive.. cough, cough..gag.. yuck. It looked like a giant sand storm coming out of that black hole. Then, just as the air started to clear, I ran out of canned air. It's the middle of the night and the only store open is several miles away. Rats! So I took a deep breath and pushed the start button. Those few seconds seemed like an eternity and then the screen flickered, I saw some words and finally the full screen. The 'Ol' Gal' is working again. How long will she work? Only God knows and He ain't sayin'!
She's run long enough for me to save the main files I was worried about to my flash drive. Wahoo! Barb doing happy dog dance here! There are still a few files on the old computer that I need to transfer, but they aren't as important as the ones I was fretting over. Moral of the story! Back up those precious files. Oh, I also printed them out so I have a visual just in case the back up fails too. LOL
Well, that's been my night. I didn't get any beading done but I did preserve my tutorials. Now that's worth losing a bit of sleep for. :)
Enjoy and bead something beautiful today!
Barb
Tuesday, July 26, 2011
Pinecone Update / Lotus Flowers
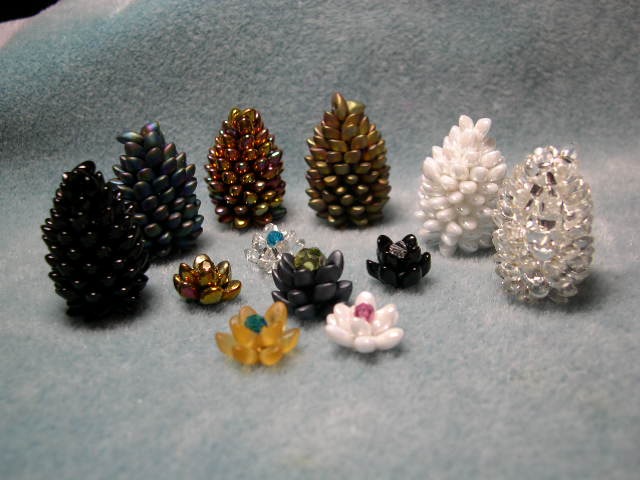
Just a quick little note to share a picture I took of some more pinecones. I also added the flowers in the center. It's fun seeing them together. They almost look like a little forest. LOL
My granddaughter says that the flowers look like lotus flowers, so from now on they're Lotus Flowers. :)

My granddaughter says that the flowers look like lotus flowers, so from now on they're Lotus Flowers. :)
Tuesday, July 12, 2011
Tiny Flowers With Long Magatama 4x7 m/m Beads
I've been having lots of fun playing around with these Miyuki Long Magatama 4/7 m/m beads!
While I was designing my pinecone I kept looking at the first couple rows and thinking what a darling little flower this would make. So I've whipped up a few just for fun. Take a look.
![]()
Most of the flowers are created by just working the first two rows of the pinecone pattern and then sewing a bead in the center. Oops, correction for the Dark gray flower. I said previously that the dark gray flower was created using the first three rows of the pinecone, but it's actually created using six beads in each row for three rows. You can see the difference in hight and appearance in the picture below. (Sorry about that.)
![]()
I think these adorable little flowers will work great for the 'ball' end of a 'ball and loop' closure on a bracelet or necklace. They also make an elegant ring. And because the bottom of the flower is flat, they work great for applique` too.
Once you learn how to tame these beads they really are a lot of fun to work with. I think their unique shape creates exciting design possibilities. :)
Enjoy! Barb
While I was designing my pinecone I kept looking at the first couple rows and thinking what a darling little flower this would make. So I've whipped up a few just for fun. Take a look.

Most of the flowers are created by just working the first two rows of the pinecone pattern and then sewing a bead in the center. Oops, correction for the Dark gray flower. I said previously that the dark gray flower was created using the first three rows of the pinecone, but it's actually created using six beads in each row for three rows. You can see the difference in hight and appearance in the picture below. (Sorry about that.)

I think these adorable little flowers will work great for the 'ball' end of a 'ball and loop' closure on a bracelet or necklace. They also make an elegant ring. And because the bottom of the flower is flat, they work great for applique` too.
Once you learn how to tame these beads they really are a lot of fun to work with. I think their unique shape creates exciting design possibilities. :)
Enjoy! Barb
Friday, July 8, 2011
The Pinecone Instructions Are Finally Finished!
Wahoooo! After all this time, the instructions for my Pinecone Delight are finally finished and up for sale. Cindy of Cindy's Crafts is selling the pattern here at the Stitchboard site.
http://stitchboard.com/mall/showItem.php?in=10222
While you're there take a look around. Mel and her hubby have created a fun site for beaders, crocheters, knitters, sewers and cross-stitchers.
I'm donating 50% of the sales of the Pinecone Delight tutorial to Cindy Tipton's Beadaide charity for beaders in need. Cindy owns Cindy's Crafts in Johnson City, Tennessee. She also sells online at http://www.beadlady.biz/ She has the special Miyuki Long Magatama 4x7 m/m beads that are used in this darling little pinecone.
Please let me know if you make on of my little pinecones. I'd love to hear from you!
http://stitchboard.com/mall/showItem.php?in=10222
While you're there take a look around. Mel and her hubby have created a fun site for beaders, crocheters, knitters, sewers and cross-stitchers.
I'm donating 50% of the sales of the Pinecone Delight tutorial to Cindy Tipton's Beadaide charity for beaders in need. Cindy owns Cindy's Crafts in Johnson City, Tennessee. She also sells online at http://www.beadlady.biz/ She has the special Miyuki Long Magatama 4x7 m/m beads that are used in this darling little pinecone.
Please let me know if you make on of my little pinecones. I'd love to hear from you!
Thursday, April 7, 2011
Barb Grainger's Long Magatama Bead Pinecone
Well, I just had to play some more with these Long Magatama beads! While I was experimenting with the Dragon Bangle instructions a few weeks ago (see previous posts) I thought to myself that these beads would make the most darling little pinecone. So I abandoned the bangle and decided to play around with it to see what I could come up with. It didn't take long before I had the most darling little pinecone in my hand. (I think someone on one of the beading forums thought the beads would work for a pinecone too, but I can't remember who it was.)
Even though I designed the pinecone right away, I've been waiting to 'debut' it until I could get the instructions written up, but I just couldn't wait any longer so I decided to go ahead and post this today. I'm working on the instructions and should have them done soon. I've decided to sell them through Cindy's Crafts http://www.beadlady.biz/ and donate a portion of the sales to her Beadaide charity. (Surprise Cindy!)
I've been showing the pictures to Cindy off and on but she's been sworn to secrecy. BTW, she keeps a good secret. :)
So, without further delay, here are my pinecones!

Here's another picture of them next to a quarter so you can get an idea of the size.

IMHO they are adorable. Can't you just imagine a bowl full of these little cuties on your table? I'm also thinking they'd make a great focal bead for a lariat. They'd also look great in a mini Christmas wreath, or you could put three of them together with a few sprigs of branched fringe for a cute little Christmas pin.
I made the light colored one first, but later decided that I wanted the pinecone just a tad shorter so I made the blue and black ones. I've since made a few more to go along with them.
Working with these Long Magatama beads is challenging at first, but once you learn how to work them they bead up as fast as any other bead. (See previous post.)
I'll let ya know when the instructions are ready. To be continued..........
Barb :)
Even though I designed the pinecone right away, I've been waiting to 'debut' it until I could get the instructions written up, but I just couldn't wait any longer so I decided to go ahead and post this today. I'm working on the instructions and should have them done soon. I've decided to sell them through Cindy's Crafts http://www.beadlady.biz/ and donate a portion of the sales to her Beadaide charity. (Surprise Cindy!)
I've been showing the pictures to Cindy off and on but she's been sworn to secrecy. BTW, she keeps a good secret. :)
So, without further delay, here are my pinecones!

Here's another picture of them next to a quarter so you can get an idea of the size.

IMHO they are adorable. Can't you just imagine a bowl full of these little cuties on your table? I'm also thinking they'd make a great focal bead for a lariat. They'd also look great in a mini Christmas wreath, or you could put three of them together with a few sprigs of branched fringe for a cute little Christmas pin.
I made the light colored one first, but later decided that I wanted the pinecone just a tad shorter so I made the blue and black ones. I've since made a few more to go along with them.
Working with these Long Magatama beads is challenging at first, but once you learn how to work them they bead up as fast as any other bead. (See previous post.)
I'll let ya know when the instructions are ready. To be continued..........
Barb :)
Tuesday, March 22, 2011
Working A Brick Stitch Base Row (Ladder Stitch) Using Only Long Magatamas
The Brick Stitch base row using only Long Magatama beads is worked exactly like any other brick stitch base row; but since the Long Magatamas are directional it's a challenge to get them facing in the correct forward and upright position.
Because of the nature of Brick Stitch, the needle alternately enters from either the top or the bottom of a bead as you work through the base row. For the base row only, you have to pick up the 1st and all odd numbered beads from the bottom. The 2nd and all even numbered LM beads are picked up from the top of the bead.
1. When working a brick stitch base row using only Long Magatama (LM) beads, pick up the 1st Long Magatama (LM) bead from the bottom, and the 2nd LM bead from the top. Pull them down together to about six inches from the tail end of the thread. Next, pass your needle back UP through the bottom of the 1st bead and then DOWN through the top of the 2nd bead. Make sure the beads are facing towards you as you hold the beadwork in your non-working hand. (see previous post for bead direction).
These beads like to twist around so you may have to manipulate them until they are facing you. Your thread should be coming out of the bottom of the 2nd bead and the "horse hooves" should be pointing towards you. If they are twisted, loosen the thread a little and turn them around. The holes in these beads are quite large so you may want to tie a knot at this point, or pass through the two beads a second time. I use doubled One-G thread but you may want to try a size D thread instead.
2. Next, pick up the 3rd LM bead from the bottom. Pass your needle DOWN through the 2nd LM bead and then back UP through the 3rd bead again. The new LM bead magically turns right side up as you tighten the thread.
3. Pick up the 4th LM bead from the TOP side by passing the needle DOWN through the top of the bead (as shown in my previous post). Next, pass your needle UP through the 3rd LM and then back DOWN through the 4th bead again.
4. Pick up the 5th Long Magatama bead from the BOTTOM side. Then pass your needle DOWN through the 4th bead and back UP through the 5th bead again. Continue making your base row until you reach the desired length.
Hint: How to keep track of where you are.
If your thread is exiting the the bottom of the bead you just added, pick up the next bead from the bottom. If your thread is exiting the top of the bead you just added, pick up the next bead from the top.
Enjoy! Barb
P.S. For more Long Magatama fun please visit Judith Bertoglio-Giffin's bead crochet site at Bead Line Studios. She's taken it one step further by bead crocheting these beautiful beads into her own designs. :)
http://beadline.blogspot.com/2011/02/whats-on-your-hook.html
Because of the nature of Brick Stitch, the needle alternately enters from either the top or the bottom of a bead as you work through the base row. For the base row only, you have to pick up the 1st and all odd numbered beads from the bottom. The 2nd and all even numbered LM beads are picked up from the top of the bead.
1. When working a brick stitch base row using only Long Magatama (LM) beads, pick up the 1st Long Magatama (LM) bead from the bottom, and the 2nd LM bead from the top. Pull them down together to about six inches from the tail end of the thread. Next, pass your needle back UP through the bottom of the 1st bead and then DOWN through the top of the 2nd bead. Make sure the beads are facing towards you as you hold the beadwork in your non-working hand. (see previous post for bead direction).
These beads like to twist around so you may have to manipulate them until they are facing you. Your thread should be coming out of the bottom of the 2nd bead and the "horse hooves" should be pointing towards you. If they are twisted, loosen the thread a little and turn them around. The holes in these beads are quite large so you may want to tie a knot at this point, or pass through the two beads a second time. I use doubled One-G thread but you may want to try a size D thread instead.
2. Next, pick up the 3rd LM bead from the bottom. Pass your needle DOWN through the 2nd LM bead and then back UP through the 3rd bead again. The new LM bead magically turns right side up as you tighten the thread.
3. Pick up the 4th LM bead from the TOP side by passing the needle DOWN through the top of the bead (as shown in my previous post). Next, pass your needle UP through the 3rd LM and then back DOWN through the 4th bead again.
4. Pick up the 5th Long Magatama bead from the BOTTOM side. Then pass your needle DOWN through the 4th bead and back UP through the 5th bead again. Continue making your base row until you reach the desired length.
Hint: How to keep track of where you are.
If your thread is exiting the the bottom of the bead you just added, pick up the next bead from the bottom. If your thread is exiting the top of the bead you just added, pick up the next bead from the top.
Enjoy! Barb
P.S. For more Long Magatama fun please visit Judith Bertoglio-Giffin's bead crochet site at Bead Line Studios. She's taken it one step further by bead crocheting these beautiful beads into her own designs. :)
http://beadline.blogspot.com/2011/02/whats-on-your-hook.html
Sunday, March 6, 2011
Dragon Bangle Bracelet From Beadwork Magazine (Feb/Mar 2011)
I rarely make anyone else's design but Dragon Bangle really caught my eye!
I love how the 'scales' look. They remind me of the 'Horny Toads (aka Horned Toad Lizard') that I used to play with as a kid in Arizona. They are full of spikes and 'spit blood'. In our young minds they weren't lizards - they were ancient dinosaurs or medieval dragons. So when I saw the awesome spikey Dragon Bangle by Nancy Jones in the February/March issue of Beadwork magazine it really jumped off the page. Link: http://www.interweavestore.com/Beading-Jewelry/Magazines/Super-Beadwork-February-March-2011.html
About the same time Cindy of Cindy's Crafts http://www.beadlady.biz/ mentioned that someone she knew was having a bit of a problem getting the scales right, so I dug out my beads and Beadwork magazine and sat down to play a little.
The bangle uses the new Miyuki Magatama Long 4 x 7 drop beads for the scales. Their unique design gives a super 3D affect to the dragon scales which I absolutely love. Kudos to Nancy Jones for creating this awesome medieval looking design.
So far, I've only done about an inch of this great little design. I got side tracked and haven't been able to get back to it. I might leave it just the way it is because it makes the coolest medieval looking ring!
All inquiries about the Dragon Bangle should be directed to Nancy Jones through Beadwork Magazine (link above).
Long Magatamas Are Directional Beads.
Working Nancy's design was the first time I'd ever used the long magatamas and I quickly realized that the they are directional. They definately have a 'top side' and a 'bottom side'. If you string the bead the wrong way it doesn't sit right and the mis-strung bead will slant upwards instead of flowing downwards with the other beads.
While I was working with these beautiful beads I noticed how much they reminded me of horse's hooves. As you can see in the picture below, the non-hole end of the bead slants downward just like a horse's hoof.

Take a close look at the picture below. You can see that the bead on the left slants downward on the non-hole end and the bead on the right slants upward on the non-hole end. So make sure that you pick up your beads from the correct side. Just for reference, I labled them top side (bead on the left) and bottom side (bead on the right). It helped me keep the beads going in the right direction.

When working brick stitch (except for the base or ladder stitch row) the needle enters from the top of the bead, passes under the next 'thread bridge' on the beadwork and then passes back up through the bottom of the bead. I laid out my beads with the topside facing up (horse hoof facing me) so they would be ready to pick up with my needle. See the picture below.


Here's another view:

See how the beads look like little horse's hooves, or little shoes. Sooo cute!
I got my beads from Cindy, http://www.beadlady.biz/beads.html
The color that I used in this sample is one of my favorites: LMA-2144. I also have black and matte black AB which I can't wait to play with.
Here's a picture of picking up an LM bead from the BOTTOM. Notice that the 'horse hoof' end is slanting downward on the left.

Hope this helps someone get a Long Magatama brick stitch base row started.
Enjoy!
I love how the 'scales' look. They remind me of the 'Horny Toads (aka Horned Toad Lizard') that I used to play with as a kid in Arizona. They are full of spikes and 'spit blood'. In our young minds they weren't lizards - they were ancient dinosaurs or medieval dragons. So when I saw the awesome spikey Dragon Bangle by Nancy Jones in the February/March issue of Beadwork magazine it really jumped off the page. Link: http://www.interweavestore.com/Beading-Jewelry/Magazines/Super-Beadwork-February-March-2011.html
About the same time Cindy of Cindy's Crafts http://www.beadlady.biz/ mentioned that someone she knew was having a bit of a problem getting the scales right, so I dug out my beads and Beadwork magazine and sat down to play a little.
The bangle uses the new Miyuki Magatama Long 4 x 7 drop beads for the scales. Their unique design gives a super 3D affect to the dragon scales which I absolutely love. Kudos to Nancy Jones for creating this awesome medieval looking design.
So far, I've only done about an inch of this great little design. I got side tracked and haven't been able to get back to it. I might leave it just the way it is because it makes the coolest medieval looking ring!
All inquiries about the Dragon Bangle should be directed to Nancy Jones through Beadwork Magazine (link above).
Long Magatamas Are Directional Beads.
Working Nancy's design was the first time I'd ever used the long magatamas and I quickly realized that the they are directional. They definately have a 'top side' and a 'bottom side'. If you string the bead the wrong way it doesn't sit right and the mis-strung bead will slant upwards instead of flowing downwards with the other beads.
While I was working with these beautiful beads I noticed how much they reminded me of horse's hooves. As you can see in the picture below, the non-hole end of the bead slants downward just like a horse's hoof.

Take a close look at the picture below. You can see that the bead on the left slants downward on the non-hole end and the bead on the right slants upward on the non-hole end. So make sure that you pick up your beads from the correct side. Just for reference, I labled them top side (bead on the left) and bottom side (bead on the right). It helped me keep the beads going in the right direction.

When working brick stitch (except for the base or ladder stitch row) the needle enters from the top of the bead, passes under the next 'thread bridge' on the beadwork and then passes back up through the bottom of the bead. I laid out my beads with the topside facing up (horse hoof facing me) so they would be ready to pick up with my needle. See the picture below.


I got my beads from Cindy, http://www.beadlady.biz/beads.html
The color that I used in this sample is one of my favorites: LMA-2144. I also have black and matte black AB which I can't wait to play with.
Here's a picture of picking up an LM bead from the BOTTOM. Notice that the 'horse hoof' end is slanting downward on the left.

Hope this helps someone get a Long Magatama brick stitch base row started.
Enjoy!
Friday, December 3, 2010
I Love Beading Flowers
Several years ago I fell in love with making beaded flowers using various beadweaving techniques. In fact, I loved them so much that I wrote a book titled, Dimensional Flowers Leaves & Vines, which unfortunately, is now out of print. Most of my flowers are just made up and may or may not resemble real flowers so I just call them fantasy flowers.
One of my favorites is a little flower I call a "Mock Poppy" because it remindes me of the beautiful little poppys that grew wild where I lived as a child. This little flower is an easy way to learn how to work tubular peyote increases. The larger flower is five sided and the smaller flower is three sided.
It was fun experimenting and making different shapes as I created various flowers for the book. It's fascinating how just changing the number of increases changes the shape of the flower. The Mock Poppy has 5 increase sections and works outward to a pentagon shape. The smaller flower has 3 increase sections and takes on a triangular shape. Another flower, "Garbriel's Trumpet" starts with fewer beads and only increases in two places. As you work it gradually takes on an oval shape.


I've always experimented with my beading. I never really thought of giving it a name until I took a right angle weave class from David Chatt. I believe it was he who called this experimenting, 'The What If Game". As you are beading just play the "what if" game. Ask youself, "What would happen if I did this.. or if I did that. What if I changed the size or number of the beads? What if I added an increase here, or made a decrease there? What if I changed techniques right in the middle of this piece? What if I gradually added larger or smaller beads? What if I ...what if I... " You'll find as you play the 'what if' game you'll enjoy creating and learn so much about beading.
I encourage you to experiment yourself and create your own beautiful flowers. Beaders have told me they are afraid to experiment because something may go wrong. I always ask them, "What's the worst thing can go wrong." Then I tell them, "The worst thing that can happen is you cut it apart and start over. You still have all the beads and all you're out is a few inches of thread and a little time. But you've gained a lot of experience and had a lot of fun." Some of my best designs have come from 'mistakes and all of them have come from experimeting and playing "The What If Game". Won't you come play with me? .
Enjoy!
One of my favorites is a little flower I call a "Mock Poppy" because it remindes me of the beautiful little poppys that grew wild where I lived as a child. This little flower is an easy way to learn how to work tubular peyote increases. The larger flower is five sided and the smaller flower is three sided.
It was fun experimenting and making different shapes as I created various flowers for the book. It's fascinating how just changing the number of increases changes the shape of the flower. The Mock Poppy has 5 increase sections and works outward to a pentagon shape. The smaller flower has 3 increase sections and takes on a triangular shape. Another flower, "Garbriel's Trumpet" starts with fewer beads and only increases in two places. As you work it gradually takes on an oval shape.


I've always experimented with my beading. I never really thought of giving it a name until I took a right angle weave class from David Chatt. I believe it was he who called this experimenting, 'The What If Game". As you are beading just play the "what if" game. Ask youself, "What would happen if I did this.. or if I did that. What if I changed the size or number of the beads? What if I added an increase here, or made a decrease there? What if I changed techniques right in the middle of this piece? What if I gradually added larger or smaller beads? What if I ...what if I... " You'll find as you play the 'what if' game you'll enjoy creating and learn so much about beading.
I encourage you to experiment yourself and create your own beautiful flowers. Beaders have told me they are afraid to experiment because something may go wrong. I always ask them, "What's the worst thing can go wrong." Then I tell them, "The worst thing that can happen is you cut it apart and start over. You still have all the beads and all you're out is a few inches of thread and a little time. But you've gained a lot of experience and had a lot of fun." Some of my best designs have come from 'mistakes and all of them have come from experimeting and playing "The What If Game". Won't you come play with me? .
Enjoy!
Sunday, July 4, 2010
Lazy Barb
I've still not done any beading on the swarovski crystal. Sigh.. She sits there all alone waiting for me to return from my 'vacation' from beading. LOL
Actually, I've tested a couple patterns for a lady I know, but I've not worked on the crystal. for a long time It's just kind of on the back burner for now. I can see the tray every time I come into my studio (fancy name for 2nd bedroom) but I have to be inspried to work on it. So far inspiration has gone on vacation. It happens to everyone and I'm not fighting it this time. LOL I'm just going to enjoy my time off and wait for inspiration to hit again. I know it will - eventually. Actually, I have tons of ideas, but I can't decide which design to do. Arrg.. I hate it when I'm undecided.
I've got some great ideas for some other things I'm designing, but I just haven't had time to really sit down and execute them. Well, that's not exactly true.. While I'm waiting for my inspiration to come back on the crystal I've been learning to tat. Can you believe it? So far I'm doing ok with needle tatting, It comes pretty naturally because I've had some kind of needle and thread in my hand ever since I was a little girl .
I'm also learning how to do shuttle tatting. But that's a horse of a different color. Whew! That 'flip' almost got to me, but I finally 'got it'. LOL Holding a shuttle is such a strange feeling but I'll get used to it..or not. LOL
The good thing about tatting is that you can add beads to it too. That's way cool!
Actually, I've tested a couple patterns for a lady I know, but I've not worked on the crystal. for a long time It's just kind of on the back burner for now. I can see the tray every time I come into my studio (fancy name for 2nd bedroom) but I have to be inspried to work on it. So far inspiration has gone on vacation. It happens to everyone and I'm not fighting it this time. LOL I'm just going to enjoy my time off and wait for inspiration to hit again. I know it will - eventually. Actually, I have tons of ideas, but I can't decide which design to do. Arrg.. I hate it when I'm undecided.
I've got some great ideas for some other things I'm designing, but I just haven't had time to really sit down and execute them. Well, that's not exactly true.. While I'm waiting for my inspiration to come back on the crystal I've been learning to tat. Can you believe it? So far I'm doing ok with needle tatting, It comes pretty naturally because I've had some kind of needle and thread in my hand ever since I was a little girl .
I'm also learning how to do shuttle tatting. But that's a horse of a different color. Whew! That 'flip' almost got to me, but I finally 'got it'. LOL Holding a shuttle is such a strange feeling but I'll get used to it..or not. LOL
The good thing about tatting is that you can add beads to it too. That's way cool!
Friday, October 23, 2009
Those Beautiful Swarovski Triangles Saga


I've resisted working with the Swarovski triangles because 'everyone's doing it'. And I don't usually follow the pack. But this time.. I when I saw the beautiful colors on Cindy's Crafts http://www.beadlady.biz/ I just couldn't resist! They are simply gorgeous!
My final choice was the 23 mm Sahara triangle. Ahhh... Visions of far away places. I was thrilled when I opened my mail box and there it was! Its mesmerizing beauty held me captive for several minutes as I turned it every which way under my ott-lite. It's vibrant colors danced and changed each time I moved it reminding me of the magic of a kalidascope. I was hooked!
I studied the various colors dancing from deep within the crystal and ran to my stash. I found just the right green, but the half-filled tube wouldn't be nearly enough to bezel the crystal. Yikes! I dashed off an emergency email to Cindy, who, through her magic, found the right beads. Yes, it had been five years since I'd bought the beads and yes, the new dye lot was a bit different, but I liked it better.
Now I was off to bezel. Yippy.. Happy dog dance going on in my studio ( fancy word for extra bedroom)!! Neighbors heard strange sounds and startled birds abandoned their nests and raced out of the trees. I worked feverishly - Well, I did! - I stayed up all night working on the piece. Finished! Wahoo! Hmm.. somehow the crystal looks darker and seems to have lost some of its luster.. It seemed sad, depressed. What happened?
I walked away and let it sit for a couple days. Maybe it would get happier if I left it alone for a while. Hmm. Still not a happy crystal..It was beautiful, but not happy. Not the mood I was going for. So, scissors in trembling hands I did it - I cut the bezel off in a couple quick snips. It slid from the crystal and laid there in a sad, rejected heap! What had I done! OMG! I killed it! But the crystal was happy! It sparkled again. It danced in my hands under the ott-lite. Wahoo! She had been revived.
My final choice was the 23 mm Sahara triangle. Ahhh... Visions of far away places. I was thrilled when I opened my mail box and there it was! Its mesmerizing beauty held me captive for several minutes as I turned it every which way under my ott-lite. It's vibrant colors danced and changed each time I moved it reminding me of the magic of a kalidascope. I was hooked!
I studied the various colors dancing from deep within the crystal and ran to my stash. I found just the right green, but the half-filled tube wouldn't be nearly enough to bezel the crystal. Yikes! I dashed off an emergency email to Cindy, who, through her magic, found the right beads. Yes, it had been five years since I'd bought the beads and yes, the new dye lot was a bit different, but I liked it better.
Now I was off to bezel. Yippy.. Happy dog dance going on in my studio ( fancy word for extra bedroom)!! Neighbors heard strange sounds and startled birds abandoned their nests and raced out of the trees. I worked feverishly - Well, I did! - I stayed up all night working on the piece. Finished! Wahoo! Hmm.. somehow the crystal looks darker and seems to have lost some of its luster.. It seemed sad, depressed. What happened?
I walked away and let it sit for a couple days. Maybe it would get happier if I left it alone for a while. Hmm. Still not a happy crystal..It was beautiful, but not happy. Not the mood I was going for. So, scissors in trembling hands I did it - I cut the bezel off in a couple quick snips. It slid from the crystal and laid there in a sad, rejected heap! What had I done! OMG! I killed it! But the crystal was happy! It sparkled again. It danced in my hands under the ott-lite. Wahoo! She had been revived.
I learned a valuable lesson in this experiment. Like a mirror, the crystal reflects the beads in the bezel. And it affects the brightness of the colors, thus reflecting the crystal's 'mood'.
Don't feel bad for those green beads. They will have a special place in this piece.
Oh, did I mention that Sahara has triplet sisters? Three Sahara squares waiting for their debut.
To be continued.........
Monday, September 14, 2009

Subscribe to:
Posts (Atom)